公测中 Now in beta

你的 AI,
随身掌控。

Your AI,
anywhere.

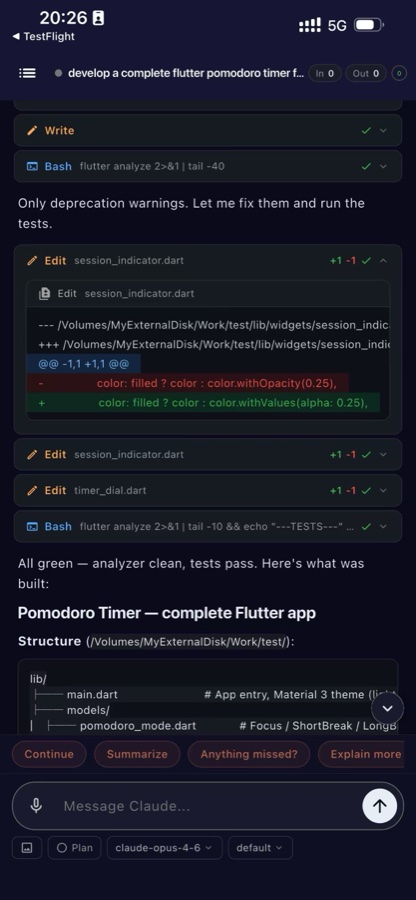
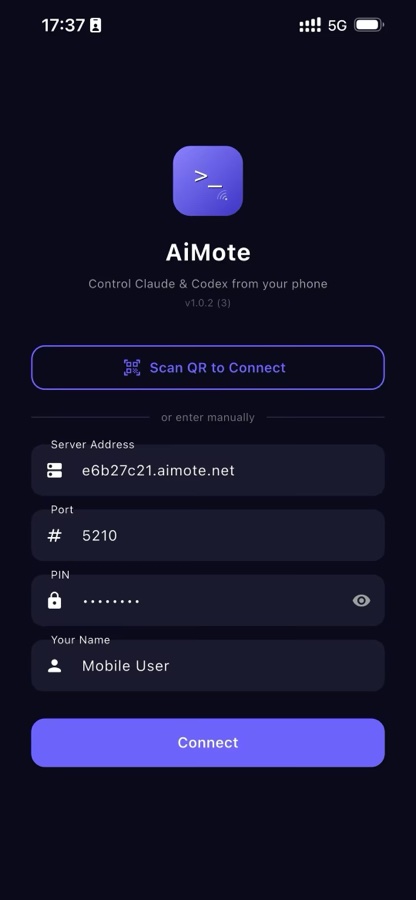
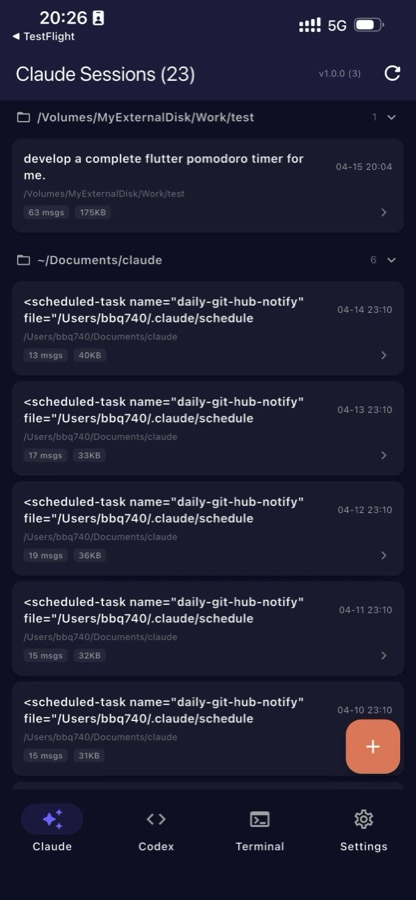
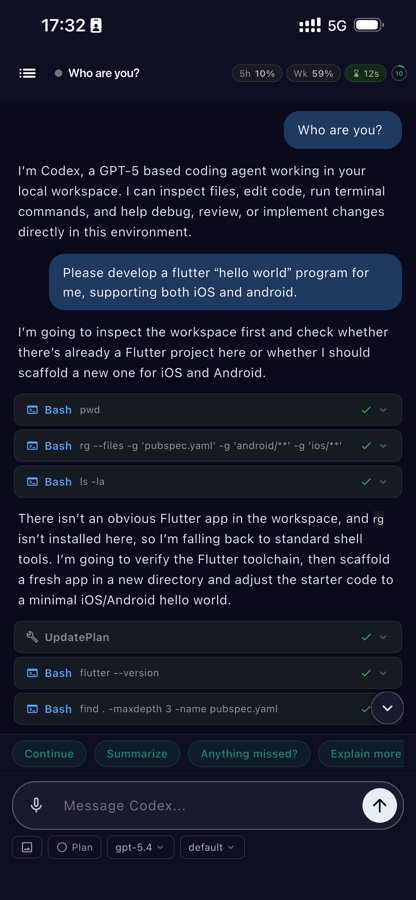
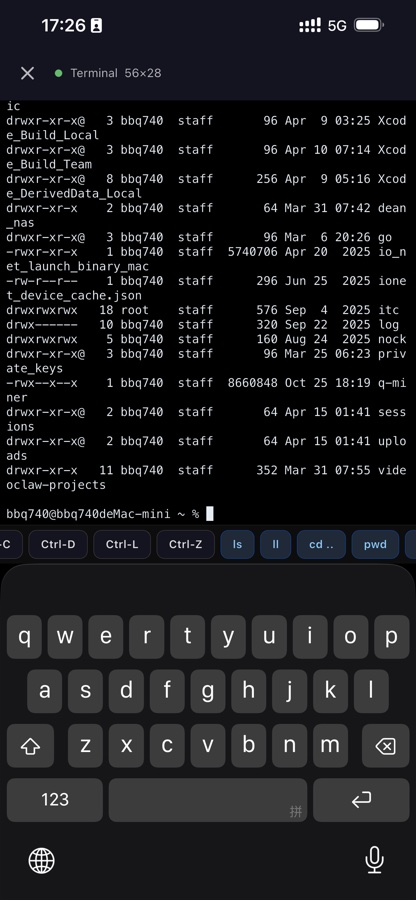
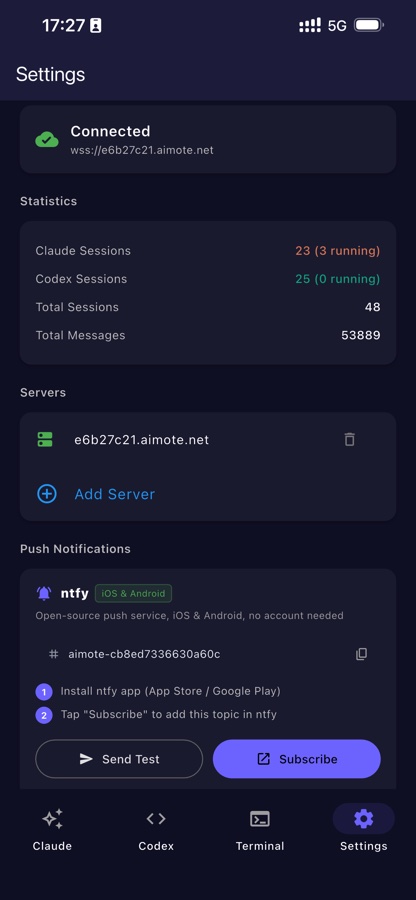
在手机上掌控 Claude Code 和 Codex CLI。一条命令安装、扫码连接——局域网或公网隧道都能用。

Control Claude Code and Codex CLI from your phone. One command install, QR scan connect — works over LAN or via secure tunnel from anywhere on the internet.

macOS / Linux bash
curl -fsSL https://aimote.net/install.sh | bash
aimote-server — zsh
╔══════════════════════════════════╗
║ AiMote Server v2.0.0 ║
╚══════════════════════════════════╝
─────────────────────────────────
Cloudflare Tunnel started
├─ Port: 5210
├─ PIN: Xk9mAp2Q
└─ Domain: a1b2c3d4.aimote.net
Scan QR to connect:
▄▄▄▄▄▄▄▄ ▄▄  ▄▄▄▄▄▄▄▄
█ ▄▄▄ █ ▄██▄ █ ▄▄▄ █
█ ███ █ ▄▀▀▄ █ ███ █
█▄▄▄▄▄█ █▄█▄ █▄▄▄▄▄█
▄▄ ▄▄▄▄▄ ▀▄▄ ▄▄ ▄▄▄▄
 ▄▀▄▀▀▄▀▀█▀▄▀▄▀▄▀▀▄▀
▀▀ ▀ ▀▀▄▀▄▄▀▀ ▀▀▀▄▀
▄▄▄▄▄▄▄ ▀▄▄▄▀ ▄ ▄▀▄
█ ▄▄▄ █ ▄▄▄▀ ▄▄▄▀▄▄
█ ███ █ █▄ ▀▄███▄▀▄
█▄▄▄▄▄█ ▄▄▀▄▀▀ ▄▄▀
URL: aimote://connect?host=a1b2c3d4...
Ready. Waiting for connections…
9:41 已连接 Connected
云指控AiMote
+
会话Sessions 历史History 设置Settings
Claude
Build a REST API
~/projects/my-api
Codex
Fix TypeScript errors
~/projects/webapp · 12 msgs
Claude
Write unit tests
~/projects/api · 8 msgs
会话Sessions
📋历史History
⚙️设置Settings

功能完备Everything you need

为希望随时随地调用 AI 的开发者而设计——无论在哪台设备上。 Designed for developers who want their AI available wherever they are, on any device.

🔒

零配置隧道Zero-Config Tunnel

启动一次服务就立刻拿到稳定的 *.aimote.net 公网地址。不用改 DNS、不用证书、不用端口转发。由 Cloudflare 提供支撑。 Start the server once and get a stable *.aimote.net URL instantly. No DNS, no certificates, no port forwarding. Powered by Cloudflare.

📱

扫码即连QR Scan Connect

打开 App,点二维码图标,对准摄像头——三秒之内连上。不用打字、不用复制粘贴。 Open the mobile app, tap the QR icon, point your camera. Done. No typing, no copy-paste — you're connected in under three seconds.

📡

实时流式输出Live Output Streaming

看着 Claude 思考、写代码,实时同步。工具调用、文件改动、终端输出——每一次动作都秒级推到你的手机。 Watch Claude think and code in real time. Tool calls, file edits, terminal output — everything streams to your phone the instant it happens.

💾

会话持久化Session Persistence

每一次对话都会归档。随时查历史、接着上次继续、跨设备无缝衔接。 Every conversation is archived. Browse history, resume where you left off, pick up a session from any device at any time.

🔐

PIN 鉴权PIN Authentication

每次连接都要 8 位 PIN。你的 AI 工作区只属于你——不会意外公开暴露。 Every connection requires an 8-character PIN. Your AI workspace is yours alone — no accidental public exposure.

🪟

跨平台Cross-Platform

macOS、Linux、Windows 都支持,Claude Code 和 Codex CLI 都能接入。手机端覆盖 iOS 和 Android。 macOS, Linux, and Windows. Claude Code and Codex CLI both supported. The mobile app runs on iOS and Android.

三步上手Three steps to AI freedom

从零到连接,两分钟搞定。 From zero to connected in under two minutes.

1

安装服务端Install the server

在 Mac/Linux 上跑 curl -fsSL https://aimote.net/install.sh | bash,Windows 用对应的 PowerShell 脚本。首次启动会进入一次性安装向导。 Run curl -fsSL https://aimote.net/install.sh | bash on your Mac or Linux machine. Windows users run the PowerShell script. The first launch starts a one-time setup wizard.

2

扫描二维码Scan the QR code

手机打开 AiMote,在连接页点二维码按钮,对准终端或浏览器里显示的那张码。 Open the AiMote app on your phone, tap the QR icon on the connect screen, and point your camera at the code shown in your terminal or browser.

3

掌控你的 AIControl your AI

Claude Code 和 Codex CLI 的会话立刻出现在手机上。新建对话、发消息、看实时输出——一切都在手机端完成。 Your Claude Code and Codex CLI sessions appear instantly. Start a new conversation, send a message, watch the output stream — all from your phone.

选择连接方式Choose your connection

挑一种适合你的场景。随时可以改 ~/.aimote/config.json 切换。 Pick the mode that fits your setup. You can switch any time by editing ~/.aimote/config.json.

自有 CloudflareCustom Cloudflare

aimote-xxxx.your-domain.com

用你自己的 Cloudflare 账号和域名。完全掌控子域名、路由规则和访问策略。 Bring your own Cloudflare account and root domain. Full control over your subdomain, routing, and access policies.

  • 使用自己的域名Your own domain name
  • 支持 Cloudflare Access 集成Full Cloudflare Access integration
  • 隧道配置可定制Custom tunnel configuration
  • 需要 CF 账号 + API tokenRequires CF account with API token
📶

本地网络Direct Network

192.168.x.x:5210

不走任何隧道。绑到 0.0.0.0 走局域网,或者自己配反向代理。适合家庭实验室和 VPN 用户。 No tunnel at all. Bind to 0.0.0.0 for LAN access, or use your own reverse proxy. Perfect for homelab setups and VPN users.

  • 不依赖任何外部服务No external services needed
  • 局域网或 VPN 都能用Works on LAN or over VPN
  • 监听地址可自定义Configurable host binding
  • 自己带反向代理Bring your own reverse proxy

用户如何连上你的服务器How users reach your server

AiMote Cloud 是默认方式——零配置,由我们的 provisioning Worker 自动处理。其他标签页是给想用自己域名或自建隧道的进阶用户。 AiMote Cloud is the default — zero config, handled by our provisioning Worker. The other tabs are for when you want your own domain or your own tunnel.

1

安装服务端Install the server

一条命令搞定——下载预编译的服务端 + cloudflared,创建启动脚本。不用 Cloudflare 账号,不用自己管 API token。 One command — downloads a pre-built server bundle + cloudflared, sets up a launcher. No Cloudflare account needed, no API token handling on your end.

# macOS / Linux curl -fsSL https://aimote.net/install.sh | bash # Windows (PowerShell) irm https://aimote.net/install.ps1 | iex
2

在向导里选 "AiMote Cloud" Pick "AiMote Cloud" in the setup wizard

aimote-server # wizard prompt → 1) AiMote Cloud ★ Recommended 2) Cloudflare Tunnel 3) Direct Network Enter 1 / 2 / 3 [1]: 1

服务端把你机器的 hash POST 给 provision.aimote.net。那里的 Worker 为你创建一个 Cloudflare 隧道 + DNS 记录,返回一个只能跑这一个隧道的 token。 The server POSTs your machine's hash to provision.aimote.net. The Worker there creates a Cloudflare Tunnel + DNS record and returns a tunnel token scoped to only that one tunnel.

3

扫二维码Scan the QR code

服务端启动后会打印一个二维码,内容是 aimote://connect?host={hash}.aimote.net&pin=…。手机 App 里点 扫码连接,就连上了。 Once the server starts, it prints a QR containing aimote://connect?host={hash}.aimote.net&pin=…. Open the phone app, tap Scan QR, done.

Binary 里没有任何凭证。 No credentials in the binary. 服务端只持有一个 tunnel JWT——能跑你自己的隧道,但改不了 DNS、碰不到其他隧道、影响不了其他人的安装。 The server holds only a tunnel JWT — it can run your tunnel, but can't modify DNS, touch other tunnels, or affect other users' installs.
1

启动一个快速隧道 Start a quick tunnel

install.sh 已经把 cloudflared 放到了 ~/.aimote/bin/,直接用它跑一个临时隧道: The install.sh script already placed cloudflared at ~/.aimote/bin/ — use it directly:

~/.aimote/bin/cloudflared tunnel --url http://localhost:5210

在输出里找 https://random-words.trycloudflare.com 这行,就是你的临时公网地址。保持该终端开着。 Look for a line like https://random-words.trycloudflare.com in the output. Keep this terminal open.

2

把临时域名填进 AiMote Point AiMote at that URL

编辑 ~/.aimote/config.json,把模式改成 manual,粘贴刚拿到的域名: Edit ~/.aimote/config.json — switch mode to manual and paste the domain:

{ "mode": "manual", "port": 5210, "host": "127.0.0.1", "pin": "...", "apiKey": "...", "manual": { "domain": "random-words.trycloudflare.com" } }

重启服务。QR 页面现在编码 wss://random-words.trycloudflare.com——在任何地方扫码都能连上。 Restart the server. The QR page now encodes wss://random-words.trycloudflare.com — scan it from anywhere.

注意:Heads up: Quick Tunnel 的 URL 每次重启 cloudflared 都会变。适合演示/测试,不适合长期使用。 Quick Tunnel URLs change every time cloudflared restarts. Great for demos and testing — not for long-term setups.
1

创建一个 Cloudflare API Token Create a Cloudflare API Token

Cloudflare Dashboard → My Profile → API Tokens → Create Token,用自定义 token 配以下权限: Go to Cloudflare Dashboard → My Profile → API Tokens → Create Token. Use a custom token with these permissions:

Zone · DNS · Edit Account · Cloudflare Tunnel · Edit

Scope 限定到你要用的账号 + Zone(根域名)。 Scope it to the account and zone (root domain) you want to use.

2

运行安装向导Run the setup wizard

如果已经有 config,先删掉再让向导重跑: If you already have a config, remove it first to trigger the wizard:

rm ~/.aimote/config.json aimote-server

向导问你的时候,选 2) Cloudflare Tunnel。粘贴 API Token,输入你的根域名(比如 example.com)。向导会自动: When asked, choose 2) Cloudflare Tunnel. Paste your API Token and enter your root domain (e.g. example.com). The wizard will:

  • 验证 token 并解析 zone IDVerify the token and resolve your zone ID
  • 创建隧道并为 aimote-xxxx.example.com 建 DNS 记录Create a tunnel and DNS record for aimote-xxxx.example.com
  • 把 tunnel token 存到 config,以后重启不再需要认证Save the tunnel token to the config so it never needs re-auth
3

启动服务Start the server

以后只要 aimote 一条命令,同时把 WebSocket 服务和 cloudflared 隧道都拉起来。子域名是稳定的——基于机器 hostname 的 hash。 From now on, aimote launches the WebSocket server and the cloudflared tunnel together. Your subdomain stays stable — tied to your machine's hostname hash.

提示:Tip: 子域名不可变(由 hostname() 计算而来)。想改的话手动编辑 config.json 里的 cloudflare.subdomain 字段。 Subdomain is immutable (derived from hostname()). If you want to change it, edit cloudflare.subdomain in config.json manually.
1

服务端绑到 localhost Bind the server to localhost

让服务端只监听 127.0.0.1,不对外暴露——公网流量由你的反代处理: Set the server to listen only on 127.0.0.1 so it's not exposed directly — the proxy handles the public traffic:

{ "mode": "manual", "port": 5210, "host": "127.0.0.1", "pin": "...", "apiKey": "...", "manual": { "domain": "aimote.yourdomain.com" } }
2

配置反向代理 Configure your reverse proxy

Caddy——自动 TLS,最简配置: Caddy — auto TLS, shortest config:

aimote.yourdomain.com { reverse_proxy 127.0.0.1:5210 }

nginx——自己带证书(Let's Encrypt 等): nginx — bring your own cert (Let's Encrypt, etc.):

server { listen 443 ssl http2; server_name aimote.yourdomain.com; ssl_certificate /etc/letsencrypt/live/aimote.yourdomain.com/fullchain.pem; ssl_certificate_key /etc/letsencrypt/live/aimote.yourdomain.com/privkey.pem; location / { proxy_pass http://127.0.0.1:5210; proxy_http_version 1.1; proxy_set_header Upgrade $http_upgrade; proxy_set_header Connection "upgrade"; proxy_set_header Host $host; proxy_read_timeout 3600s; } }
必备:Must-have: UpgradeConnection: upgrade 这两个头是 WebSocket 握手必须的。少了客户端会卡在认证阶段。proxy_read_timeout 调到一小时以上,长会话才不会被切断。 The Upgrade and Connection: upgrade headers are required for WebSockets. Without them the client hangs at auth. Raise proxy_read_timeout to an hour so long-running agent sessions don't get cut.
3

重载 & 验证 Reload & verify

# Caddy caddy reload # nginx sudo nginx -t && sudo nginx -s reload # Quick check — should print HTTP 101 Switching Protocols curl -i -N -H "Connection: Upgrade" -H "Upgrade: websocket" \ -H "Sec-WebSocket-Key: test" -H "Sec-WebSocket-Version: 13" \ https://aimote.yourdomain.com/

📱 客户端如何解读你的配置 How the client reads your config

手机 App 根据你在连接表单里输入的内容选用不同的 URL 协议: The mobile app picks a URL scheme based on what you type into the connect form:

  • 看起来像域名(包含字母 + 点)→ 强制 wss:// 走 443 端口。端口字段被忽略。 Looks like a domain (contains letters + a dot) → always wss:// on port 443. Port field is ignored.
  • 看起来像 IPws://ip:port 明文 TCP。 Looks like an IPws://ip:port, plain TCP.
  • wss://ws:// 开头 → 原样使用。 Starts with wss:// or ws:// → used as-is.
所以:So: 你配置的域名必须能走 https:// 443 端口并带有效 TLS 证书。自签名证书会被拒绝。 any domain you configure must be reachable over https:// on port 443 with valid TLS. Self-signed certs will be rejected.

立即开始Get started now

在电脑上装服务,在手机上下载 APP。 Install the server on your machine, download the app on your phone.

🖥️ 服务端Server

支持 macOS、Linux、Windows。需要 Node.js 20+。 Runs on macOS, Linux, and Windows. Requires Node.js 20+.

macOS / Linuxbash
curl -fsSL https://aimote.net/install.sh | bash
Windows (PowerShell)powershell
irm https://aimote.net/install.ps1 | iex

或手动克隆编译: Or clone and build manually:
git clone … && cd server && npm install && npm start

📱 手机 AppMobile App

iOS 与 Android 都有,免费下载。 Available for iOS and Android. Free to download.

服务端机器需要: Requirements on your machine:
• 装了 Claude Code CLI 或 Codex CLI
• AiMote 服务端需要 Node.js 20+
• macOS / Linux / Windows
• Claude Code CLI or Codex CLI installed
• Node.js 20+ for the AiMote server
• macOS, Linux, or Windows